![]()
|
|
|
Rev 9/7/12 fixed |
modified with ProHDR, an iPhone Photo APP
|
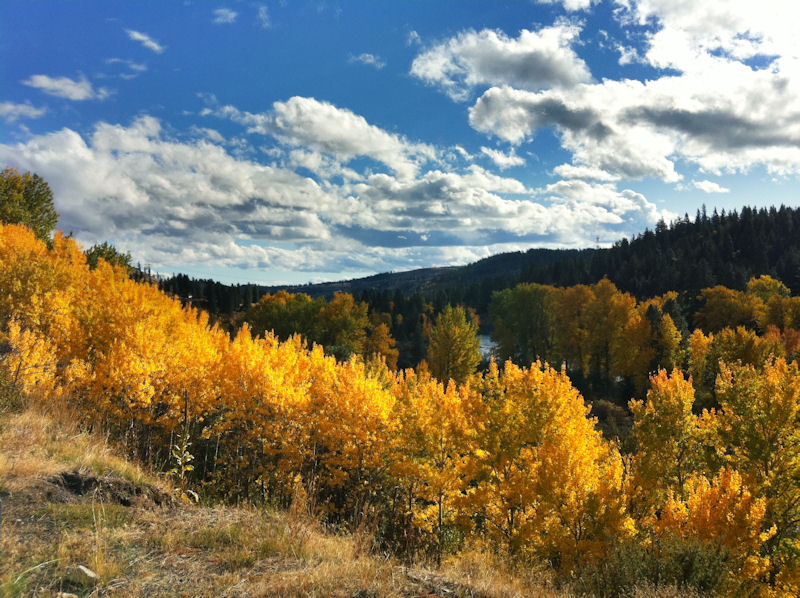
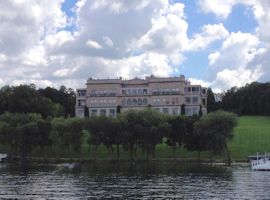
When we came upon this seen while driving along the Yakima river in the
fall, it was obviously worth a stop. The first picture I took was
with the regular camera in my iPhone 4 but the sky came out all washed
out. I retook the picture using ProHDR and the sky came out
beautifully. Perhaps even over exaggerated. The basic problem is that the eye can see a wider range of lights and darks than cameras can. Where it looks all washed out or very dark in the picture, our eyes can still pick out a lot of detail. HDR (High Dynamic Range) camera apps work by taking multiple pictures with different exposure settings then merging the best of each to make a composite picture. There are a couple of potential stumbling blocs involved. There is inherently a delay between the two pictures and in a hand held camera there is obviously some motion between the two. The program tries to fix this problem by moving and rotating the two pictures around till they find the best alignment. The problem with this approach is that the amount of moving and rotating required is a function of how far away the item in the picture is. If the picture is something like a mountain framed in a window, then there is a tendency for either the mountain or the window frame to be out of focus. To minimize this problem, try to steady the camera against a firm object. Obviously if there is someone walking though the picture, you are hosed. Another problem is the Sky tends to be artificially light next to the skyline. This is particularly noticeable at the skyline in the right side of the picture. I have checked other HDR programs and they all seem to have this problem. There is a version of HDR that comes with the iPhone and others on the App Store such as TrueHDR but I like Pro HDR the best. To see a YouTube video of Pro HDR click HERE. Using ProHDR to get good sunset/sunrise pictures. To get a good sunset or sunrise picture, you want to underexpose the picture, it should look like it is getting dark outside. You can post process your picture to darken it with something like PS Express discussed elsewhere on this web site, or you can use the darker image taken by ProHDR and just through away the lighter image and the final one. Using ProHDR to fix up an existing Photo The above example is the most common use for ProHDR but it can also be used to combine excising photos in your library. One reason to do this is if the original photo has areas that are too dark but when you lighten the photo the light area turns to white. The examples below illustrates that operation. To get ProHDR to use existing photos select "Actions" on the bottom right of the ProHDR screen. Then select "HDR From Library". It than asks you to select the first image (which should be the darker one where the highlights are properly exposed). Then you select the second image (The lighter ones where the shadows are properly exposed). The program then combines the two images. I created a second lighter image using the exposure adjustment in PS Express on my cell iPhone so all steps were completed on my iPhone. (As a side note, I have no idea what the difference is between adjusting exposure and brightness on an existing photo is but adjusting exposure seems easier to me.)
The leftmost one is the original. In the second picture, the image
has been cropped using PS Express.
The third photo is the second with the exposure adjusted to being
out the details of the building. This was also done with PS Express.
The picture on the right was created with Pro HDR by combining the
light and dark images.
|
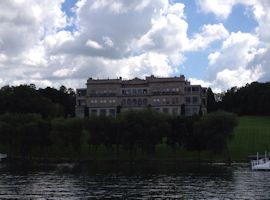 Original (dark photo) |
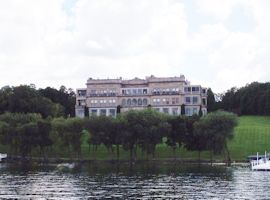 Lightened photo |
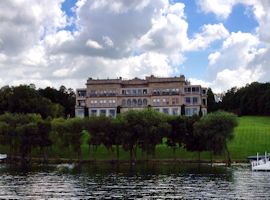 Final combined photo |
As a side note, it is worth noting that the same effect could be achieved using desktop photo editing software such as Adobe Photo Shop or possibly Adobe Photo Express. I use Paint Shop Pro from Corel. The basic idea is that fancier photo editing programs allow you to adjust the brightness separately for the shadows, midtones, and highlights. In practice is was not that easy but the process gives some additional insight to some other changes ProHDR seems to be making. The original photo is the original shown above.
 Lightening the shadows Adjust>Brightness and Contrast>highlight/midtone/shadow Settings: Shadow: 80 Midtone and Highlight: 0 |
 Adding vibrancy (brightness) Adjust>Hue and Saturation>Vibrancy Setting: Strength 87 |
 Sharpening Adjust>Sharpness>Sharpen More |
Other HDR Programs